Getting started
When users log in to Axiell Go, any permissions assigned to their account will be applied. Permissions control which records and modules users can access, as well as what functionality and operations are available to them.
User permissions are specified in the Registry module of the EMu desktop client.
If you are new to Axiell Go or require an overview of its User Interface and functionality, this page is for you. Here you will find assistance to guide you through most everyday tasks, as well as an explanation of the User Interface you will encounter when performing those tasks (full details about the User Interface can be found here).
If more advanced information is available than is required to get up and running with Axiell Go, links are provided for your reference.
Axiell Go is accessed with a web browser on a smart phone, tablet, laptop, PC or Mac.
Note: To access your institution's Axiell Go installation you will need its URL (web address) and a user account. Your System Administrator can provide both.
- With any supported web browser, navigate to your institution's Axiell Go installation.
The Login screen requires a username and password:

Note: The Login screen identifies both the version of Axiell Go you are logging in to, and of the underlying EMu system.
-
Enter your username and password and click Login.
Axiell Go uses the same username and password as EMu. If you don't have an EMu account, ask your System Administrator to create an account for you.
When you sign in to Axiell Go, any permissions assigned to your EMu account will be applied. Amongst other things, permissions control which records, modules and fields you can access, as well as what functionality and operations are available to you.

The Axiell Go Dashboard displays when you log in.
Axiell Go has a responsive user interface that adapts to the device on which it is accessed. How you access options will therefore depend on the dimensions of your screen. On a large screen (desktop or tablet), Axiell Go will appear similar to this:

The main difference when viewing Axiell Go on a small screen (a smart phone for instance) is how various options are accessed. As we see in the screenshot above, Workspaces (2), Tasks (4) and Account details (5) are always visible on a large screen. On smaller screens, these options are accessed from the Menu icon:

Read on for details about each of the features numbered in the screenshot above:
Axiell Go is designed to guide users through everyday collections management tasks. All activities and tasks are presented in workspaces (similar to tabs in a web browser) and multiple tasks can be managed simultaneously by flipping between open workspaces. Axiell Go has a responsive user interface that adapts to the device on which it is accessed. How you access options will therefore depend on the dimensions of the screen used to view Axiell Go.
The Dashboard is the default workspace when you log in to Axiell Go. Here you will find statistics about the day's sessions (user logins) and about records (added, edited, deleted), as well as Release Notes and news about Upcoming releases.
A session commences when a user logs in to Axiell Go, and ends when they log out. The Dashboard displays the number of sessions throughout the current day on a graph:

Session statistics include:
- Active: the number of active sessions (this number will change as users log in / out of Axiell Go).
- Avg P/H: the average number of sessions per hour.
- Total: the total number of sessions for the day.
Record statistics are for all users and can be viewed for the month or current week. Statistics include the number of records:
- Added
- Edited
- Deleted
If you close the Dashboard and wish to reopen it:
- If the Workspaces bar is visible (2 on the screenshot above), select the + in the Workspaces bar
-OR-
- (On smaller devices) select the Menu icon
 and then select New workspace.
Note: It is only possible to close the Dashboard when another workspace is open.
When logging in to Axiell Go, the first workspace presented is the Dashboard. When you start a search by selecting ![]() , or commence a task (to create a new Parties record, for instance), a workspace is added to the Workspaces bar:
, or commence a task (to create a new Parties record, for instance), a workspace is added to the Workspaces bar:

On small screens, open workspaces are accessed via the Menu icon ![]() :
:

You can keep workspaces open, switching back and forth between them, or close them by selecting:
-
 in a workspace tab on a large screen:
-OR-
-
 beside a workspace label on a small screen.
Tips
- It is only possible to close the Dashboard when another workspace / tab has been added. Click the + in the Workspaces bar to open a new Dashboard workspace.
- If you navigate away from the workspaces (by clicking the Task
 icon for instance), selecting the Home
  button (available on large screens) displays the workspaces.
Select the Search icon ![]() to search your records. A Search workspace with a basic search form is added to the Workspaces bar:
to search your records. A Search workspace with a basic search form is added to the Workspaces bar:

With the Search workspace you can search across all modules and records that you are authorized to access.
Details about running a search are available below.
The primary purpose of Tasks is creation of new records:
- On a large device (desktop or tablet), select the Tasks icon (4 in the image above).
- On smaller devices, such as smart phones, Tasks are accessed via the Menu icon:

A list of tasks is presented:
- The list can be filtered by keying letters into the Filter tasks field.
- Select a task name to begin creating a new record:


An Insert Workspace is added to the Workspaces bar. Working in the Insert Workspace is the same as working in the Edit Workspace:
- Select a Record Section in the Record Sections pane.
- Expand each Field Group and add details to the fields:


Details about working with each type of field can be found here.

Here you will find an option to Logout of Axiell Go.
If left unattended, your session will timeout eventually. However, to avoid unauthorized access to your collections data, be sure to log out of Axiell Go when your work is done.
What next?
The Search workspace allows you to search across all modules and records that you are authorized to access:
-
Select the Search icon
 to search your records. A Search workspace with a basic search form is added to the Workspaces bar:
- Select a module
 The management of a collection can involve a vast amount of information about collection objects / items, people and organizations, events, administration and more. This information is stored in modules (database tables) that are specific to the type of information: for instance, the Parties module stores information about people and organizations involved in some way with your collection. from the drop list:
- Enter your search term in the Search field.

Your search term can be as simple as a single word or it can be one or more of a range of search types (phrase, stemming, phonetic, etc.), employing wildcard characters, and case sensitivity for instance. Full details here.
-
To run the search, select Search
-OR-
Hit Enter if you have a keyboard.


By default, Summary Data is queried for your search term (a record is returned if your search term matches a value in the record's Summary Data).
Every record has a Summary Data field. Summary Data is a combination of key data in a record (taken from one or more fields). Which field or combination of fields in a module is used to make up Summary Data can be specified by each institution (and implemented by Axiell developers).
Search results are presented in a table by default: each row in the table is a record, and each column a field (or combination of fields) in the record:

As we see in View Search Results (below), from here it is possible to:
- Return to the search form (retaining your previous search terms).
- Start a new search in another workspace.
- Sort your results.
- Change how you view search results.
- View details of a record and then edit them.
Search results are presented in a table (Grid View) by default: each row is a record, and each column is a field (or combination of fields) in a record. Only a subset of fields is shown:

Without closing the current Search workspace, select ![]() to add another Search workspace and begin a new search.
to add another Search workspace and begin a new search.
Tip: Flip back and forth between workspaces to compare search results and record details.
Select ![]() to return to the search form in the current workspace:
to return to the search form in the current workspace:
Note:
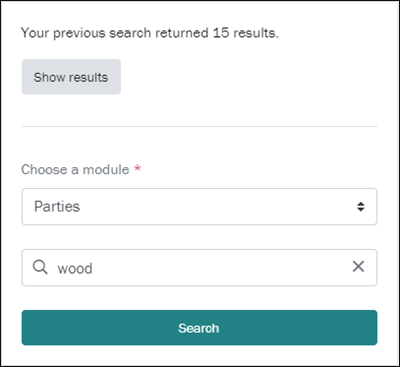
- The search term(s) and module selected for the previous search remain. Change these as required to perform a different search.
- Select Show results to redisplay the results of the previous search.
While you could select Search to re-run the search, selecting Show results has the following advantages:
- Any changes you made to the previous search results - sorting and selecting records - will be retained when you redisplay the results of the search.
- It can be quicker than re-running the search as the results are cached.
- Select and hold the column icon
 .
.The cursor will change to indicate that the column can be resized:

- Drag left or right to increase or decrease the width of the column, and release.
Select (click / press) a column header to sort records (lowest to highest; A to Z). Select again to reverse the order.
Any column can be used to sort records, but records can only be sorted on one column at a time.
Whenever records are sorted on a column, an arrow head displays beside the column name. The direction of the arrow indicates whether records are sorted in ascending or descending order. In this example records are sorted by IRN in ascending order (from lowest to highest, e.g. 1 to 100):

Search results are presented in a table  (Grid View) by default (as shown above), or as a List View
  (showing Summary Data):

Options are enabled when Grid View is selected:

Grid settings allow you to modify the order of columns and determine which columns display:

- Column Order: change the order of columns in Grid View:
- Drag and drop to reorder: select the hamburger icon in a row
 and drag; release.
-OR-
- Select the appropriate arrow head to move a column up or down the order:

- Drag and drop to reorder: select the hamburger icon in a row
- Show / Hide
Select a row to show / hide a column (the tick toggles on to show and off to hide a column):


Select (click / tap) a record in the list of search results to view full record details:
- Large screens (the Workspaces bar is visible): a panel displays to the right of the search results with the record's details.
- Smaller devices: the Search results screen is replaced by the Details View.
You've run a search and records are listed in Grid or List View showing a subset of fields. To view all data available for a record, select (click) the record to display it in Details View:
- On a large screen (the Workspaces bar is visible), the Details View pane will display on the right:

- On a small screen, the display changes to Details View:


A record's data is organized in Record Sections (if you're familiar with the desktop version of EMu, a Record Section is similar to a Tab) and Field Groups.
The management of a collection can involve a vast amount of information about collection objects / items, people and organizations, events, administration and more. This information is stored in modules that are specific to the type of information: for instance, a Parties module holds records about people and organizations involved in some way with your collection.
Within a record, information is organized in logical groupings called Record Sections. In a Parties record there is a Record Section for recording a person's name (Person), another for address details (Address), another for details about a person's roles (Roles), and another for recording biographical details (Biography), and so on. In the screenshot below, the Record Section displaying is Person. In each Record Section, related fields are grouped under a heading. On the Person Record Section we see six Field Groups:
- Party Type
- Person Details
- Gender
- Language
- Derived Names
- Source of Information
To view fields and the data in them, expand a Field Group (5 on the screenshot below):
|
|
# |
Option |
Details |
|---|---|---|---|
|
|
1 |
Navigate |
Select the previous / next arrow to display details for the previous / next record in the current search results list. |
|
2 |
Close |
Select to close the Details View pane and return to the current list of records. |
|
|
3 |
Summary Data |
Every record has a Summary Data field. Summary Data is a combination of key data in a record (taken from one or more fields). Which field or combination of fields in a module is used to make up Summary Data can be specified by each institution (and implemented by Axiell developers). As we see above, in the Parties module the Summary Data for a Person party is a combination of data drawn from several fields:
Note: By default, when you run a search using the Search form, your search terms are queried against Summary Data. If your search term is found in a record's Summary Data, that record is returned by your search. |
|
|
4 |
Record Sections & Record Views |
A record's data is organized in Record Sections and Field Groups.
When viewing or editing records in some modules, the Record Sections pane will include a Record view drop list:
A Record View is a view of a record tailored to a particular purpose (or group of users). Typically, tailoring involves simplifying the information presented to a user by reducing the number of Record Sections and fields displayed. By default, when viewing or editing a record's details, all Record Sections and fields that you are authorized to access are displayed. Depending on the module, there might be twenty or more Record Sections and many hundreds of fields. For many everyday tasks you do not need to see every field, only a subset, and a Record View can be configured to present only those fields required to perform the task. If we are only interested in viewing or editing condition check details, a Condition Check Record View can be made available from the Record Views drop list:
Selecting this Record View will reduce the details presented to only those relevant for condition checks:
Note: At the moment, Record Views are configured by Axiell Developers. Please contact Axiell Support to discuss the creation of different Record Views. A facility will be provided in a future release to enable user configuration of Record Views. |
|
|
5 |
Show / Hide fields |
Select to expand a Field Group and show its fields and data. Select again to close the Field Group. In this example, the Person Details Field Group has been expanded:
|
|
|
6 |
Edit |
Select |


 to edit record details.
When a record is in Details View (you've run a search and selected a record, or perhaps you've just added a new record), it can be edited:

- Select Edit.
An Editing workspace is added.
Understanding the Editing WorkspaceOn a large screen (the Workspaces bar is visible), an Editing Workspace is added to the Workspaces bar:

On a small screen, the display changes to an Editing Workspace:

In this example we see that a record in the Parties module is available for editing. The current Record Section is Person:
- Six Field Groups are available in the Person Record Section.
- A Field Group, called Party Type, has been expanded and the data in its field is ready to be edited.
1. Show / Hide fieldsSelect to expand a Field Group and show its fields and data. In the example above, the Party Type Field Group has been expanded to reveal its field and data, which can now be edited.
Select again to collapse and hide the Field Group.
2. Record Sections & Record ViewsThe Record Sections pane is hidden by default:
- Select
 to display available Record Sections.
 Select a Record Section in the list (Address in the example below) to display its Field Groups.
- On a large screen you can choose to keep the Record Sections pane open; on a small screen you will need to close it in order to see the Field Groups:

When viewing or editing records in some modules, the Record Sections pane will include a Record view drop list:

A Record View is a view of a record tailored to a particular purpose (or group of users). Typically, tailoring involves simplifying the information presented to a user by reducing the number of Record Sections and fields displayed.
By default, when viewing or editing a record's details, all Record Sections and fields that you are authorized to access are displayed. Depending on the module, there might be twenty or more Record Sections and many hundreds of fields. For many everyday tasks you do not need to see every field, only a subset, and a Record View can be configured to present only those fields required to perform the task.
If we are only interested in viewing or editing condition check details, a Condition Check Record View can be made available from the Record Views drop list:

Selecting this Record View will reduce the details presented to only those relevant for condition checks:

Note: At the moment, Record Views are configured by Axiell Developers. Please contact Axiell Support to discuss the creation of different Record Views. A facility will be provided in a future release to enable user configuration of Record Views.
3. Options: Revert ChangesWhen you edit a record, and BEFORE you save the record, you will find an option to Revert Changes from the Options menu (beside the Save button):

Select this option to return the record to the state it was in before you made any changes to it.
4. Show / hide list of Record SectionsMaximize screen real estate when editing fields by selecting
 to hide the Record Sections pane.
Alternatively, select the
above the list of Record Sections.The icon changes to
. Select it again to display the Record Sections pane. - Make your changes to the record.
How you edit a field depends on the type of field.
What type of field is this?Field Type
Details

When an Attachment field is selected, it can be identified by the Browse button.

Date fields are identified by the Calendar icon
 .
.
Lookup Lists are identified by the following icon
 .Attachment fields
An attachment is a link to another record in the same or another module. An example of an attachment field is Party: (Associated With) in the Parties module, a field used to link to one or more Parties records associated with the current Parties record:

Note: Party: (Associated With) is one column in the Associated With table. Each row in the table holds details about an associated party, including a link to a Parties record, the role of the linked party, as well as start and end dates for the association. See Tables below for details of working with tables.
In this example a Parties record is attached to two other Parties records. Select the attachment field to edit the attachment:
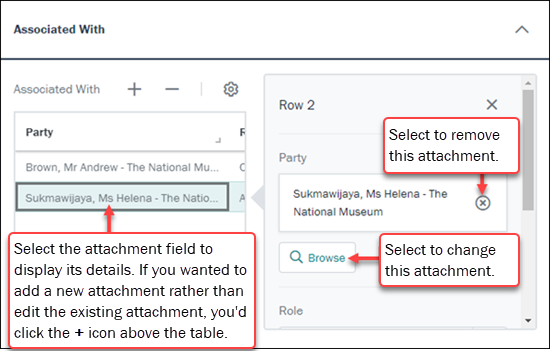
To change the attached record:
- Select Browse.
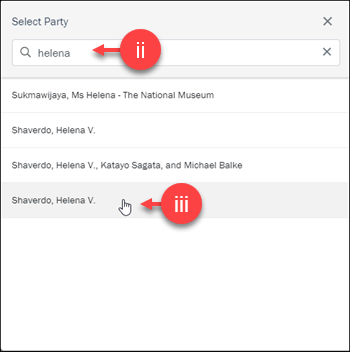
The Select box displays with a list of potential attachments:

- In the Search field, start keying details of the record to attach to.
The list will filter to matching records.
- Select the required record to make the attachment:
The attachment field will be updated:

Date fieldsDate fields are identified by the Calendar icon
. The required format for the date is indicated:The simplest way to add a date is to key it in the format shown:

As we see, when the cursor is in a date field, several tools become available offering alternative ways to enter a date.
One option is to tap / click each component of the date (e.g. dd), and use
 to increase / decrease the number.
Alternatively, select a date from the calendar:
- Click / tap the arrow
 to reveal the calendar.
 - Select the month / year:
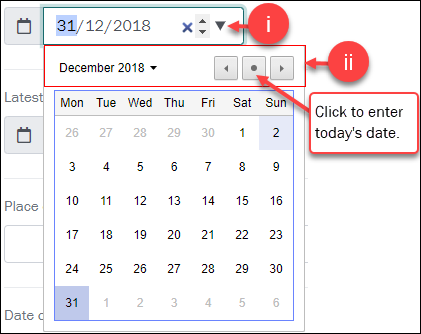
Either:
- Use the arrow heads to move forward / back by one month per click / tap:

- Click / tap the required day.
Or:
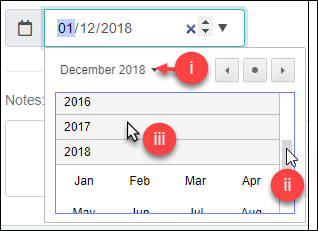
- Click / tap
 beside the current month & year to reveal a scrollable list of years.
 - Scroll back / forwards to another year.
- Select the required year:
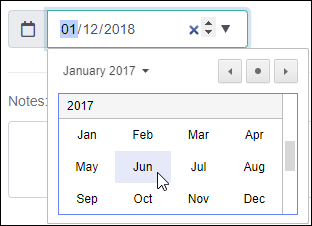
- Select the required month:
- Select the required day:
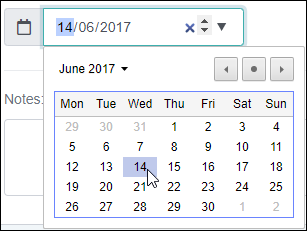
- Use the arrow heads to move forward / back by one month per click / tap:
Lookup ListsLookup Lists are identified by the following icon
:About Lookup Lists: good practice and permissionsAlso known as a Pick List or Authority List, a Lookup List is a list of the values that have either been used or are suggested for use in a field. Rather than keying a value into the field, it is possible to pick a value from the Lookup List. Benefits of selecting a value from a Lookup List rather than keying a value directly into a field include:
- Less typing.
- Consistent spelling of values entered in fields.
- Use of the correct (approved) terminology when running a search or editing a record, e.g.
Sales PersonnotSalesman.
Permissions assigned to Lookup Lists determine whether you can add values to the list and, if so, whether you are prompted to confirm any new value added:
- ReadOnly - you must use an existing value and cannot add a new value to the Lookup List.
- ReadWrite (with prompt) - you can add values to the Lookup List but will be prompted before a new value is added.
- ReadWrite (without prompt) - you can add values to a Lookup List and can do so without being prompted.
To select a value from a Lookup List
- Tap / click the Lookup List button in a field.
A pop-up selection box will display with a list of values suggested for the field:
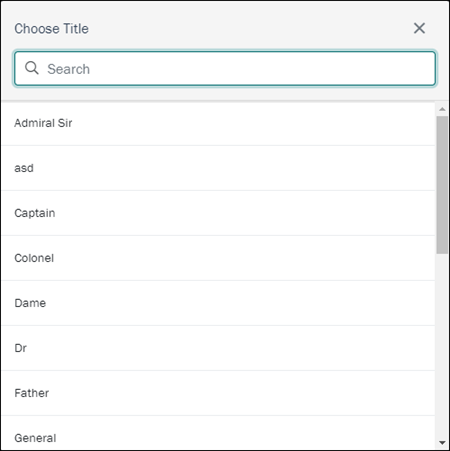
- Locate the value you are after by scrolling through the list (use the scroll bar or the keyboard arrow keys)
-OR-
Begin entering the required value in the Search field; the list of values will be filtered as you key letters.
- Tap / click the required value.
The selected value will be entered into the Lookup List field.
If the value you want to enter is not in the Lookup List and you have permission to enter the value, simply key the value into the field:
- If the Lookup List is ReadWrite, the value will be added to the Lookup List when the record is saved.
- If the Lookup List is ReadOnly, you will not be able to save the new value and will need to select an existing value in the List.
More details about Lookup Lists can be found here.
MultimediaThe EMu Multimedia RepositoryIn EMu, multimedia is stored and managed in a Multimedia module. The Multimedia module complies with the Dublin Core Metadata Standard and the complete Dublin Core attribute set can be recorded for each multimedia resource. Records in almost every module can include multimedia resources; and there is no limit to the number of multimedia resources that can be included with a record, nor the type of those resources.
Multimedia resources can be added to records in EMu in several ways, including:
- Creating a record in the Multimedia module for the resource and then attaching the record to any other record.
- Adding the multimedia to a record in any EMu module; this will automatically create a record for the resource in the Multimedia module.
The second of theses methods, described below, is used in Axiell Go.
See the EMu Help for details about:
System Administrators will find details about Multimedia Registry entries here.
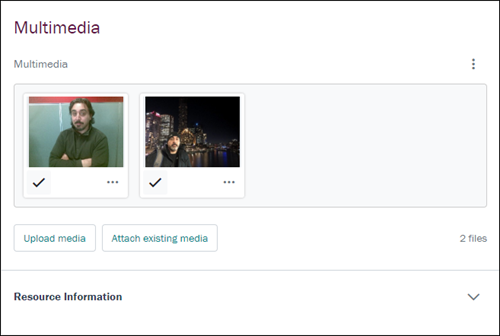
Multimedia is managed on the Multimedia Record Section in most EMu modules. In this example, a Parties record is shown and the Multimedia Record Section has been selected:

Tip: Select (click / tap) a thumbnail to view the resource.
1. Options (Sort and Remove media from the current record)Options include:
 Remove selected
This option will only display if the tick (3 in the image above) is selected for one or more resources.
- Select the tick for one or more resources.
The tick will appear filled:

- Select Remove selected.
The number in brackets indicates the number of selected resources.
Any ticked resources are removed from the record.
Note: Resources are only removed from the record; they are not removed from the database and can still be added to records.
Sort mediaThe Sort media option is faded and disabled until more than one resource is added to the current record:
- Select Sort media.
Icons display beneath each resource thumbnail:

- Drag and drop a resource to a new position by selecting
 (hold down the icon, drag to the new location and release).
-OR-
Click an angled bracket (< or >) to move the resource to the left or right of its current position (if possible):

- Select Done.
Remove all mediaSelect this option to remove all media from the current record.
Resources are only removed from the record; they are not removed from the database and can still be added to records.
Resources can also be removed using the Resource options (see below).
2. Resource options (Download and Remove)Each resource includes an options icon. Options include:
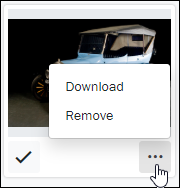
- Download
Download the multimedia resource to your device.
- Remove
Remove the resource from the current record.
Note: The resource is only removed from the record; it is not removed from the database and can still be added to records.
3. Select a resource (for further processing)Select (tap / click) the tick in order to perform various actions on the resource.
The tick will appear filled:
Once selected, various options become available (see 1 above).
4. Upload media and attach it to the current recordTo add one or more new resources to Axiell Go and attach to the current record:
- Select Upload media.
The Open (or equivalent) dialogue box will display.
Navigate to the resource(s) (on your local file system, network drive, cloud, etc.).
- Select one or more resources.
- Select Open (or the equivalent button in the dialogue box) or double-click the selected resource(s):
- The resources are uploaded to Axiell Go.
- A record is created in the Multimedia module for each resource.
- The newly created record(s) for each resource is attached to the current record:
What happens when a resource is uploaded to Axiell Go?Axiell Go is a web interface to your EMu Collections Management System (CMS) and changes you make in Axiell Go update your EMu CMS.
When multimedia resources (images, documents, etc.) are added to EMu it is possible to generate alternative formats (derivatives) automatically. When an image is added to EMu for instance, it is possible to generate different image formats and sizes automatically to satisfy different requirements: a thumbnail JPEG can be generated for browsing, an 800x600 PNG image for publication on the web, whilst maintaining the image in its original format and resolution.
In the previous example, an image
gerard.jpgwas attached to the current record in Axiell Go. Behind the scenes, in the EMu Multimedia module, we can see that seven derivatives were automatically generated:
Details about Multimedia and automatic generation of derivatives can be found here.
5. Attach existing media to the current recordSelect this option to attach an existing Multimedia record to the current record (the media resource you want to attach to the current record is already recorded in the Multimedia module). The Attach media box will display with a list of available media:

- Either:
- Enter a search term in the Search field; the list of media will filter automatically to matching media as you enter a search term.
-OR-
- Scroll through the list to locate the required media.
- Enter a search term in the Search field; the list of media will filter automatically to matching media as you enter a search term.
- Select the Attach button for one or more resources.
The resource is added to the current record and the Attach button changes to Remove:
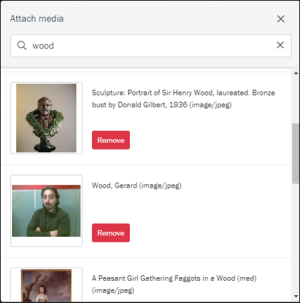
Tip: If you add the wrong resource, select Remove.
- Close the Attach media box by selecting the X in the top right of the box, or click anywhere off the Attach media box:

TablesTables are used where a field can hold multiple values.
A table can be simple and have only one column (one value per row), or it can have multiple columns (multiple values per row).
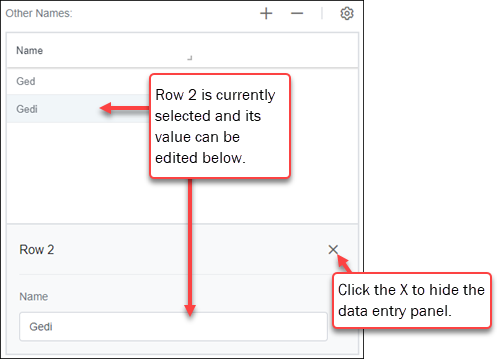
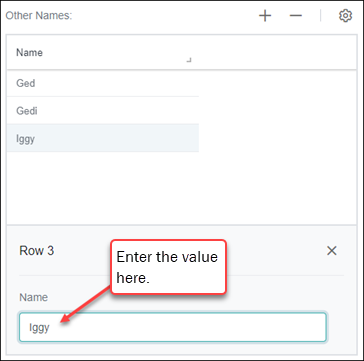
A good example of a single column table is Other Names: (Person Details) in the Parties module (in the Person Record Section). To change a value in a single column table, select its row and edit it in the data entry panel that displays (below or to the right of the table depending on the size of your screen):
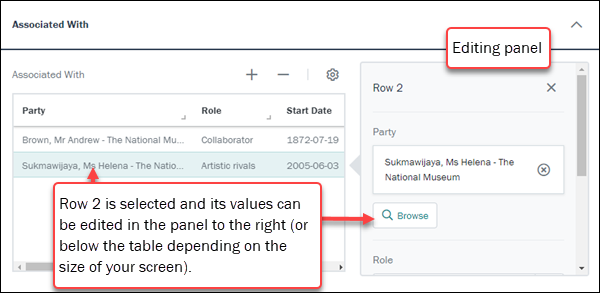
A good example of a multi-column table is Associated With in the Parties module (in the Associations Record Section). Each row holds details about an associated party, including a link to a Parties record, the role of the linked party, and start and end dates for the association.
To change a value in a multi-column table, select its row in the table, locate and change the value in the scrollable data entry panel that displays (below or to the right of the table depending on the size of your screen):
Tip: An example of editing a multi-column table is provided below.
Icon Purpose
Description +
Add a row
Select + to add a row to the table. A data entry row is added below or to the right of the table (Row 3 in this example). Enter values in the data entry row:
-
Remove a row
If there is more than one row in the table, select the row to be removed and then select -.
In the previous image, selecting - would remove Row 3.
Resize a column
- Select and hold the column icon .
The cursor will change to indicate that the column can be resized:
- Drag left or right to increase or decrease the width of the column, and release.

Table settings
Select
to display the Column settings box:
- Column Order - where there is more than one column, change the order of columns in the table:
- Drag and drop to reorder: select the hamburger icon in a row
 and drag; release.
-OR-
- Select the appropriate arrow head to move a column up or down the order:
- Drag and drop to reorder: select the hamburger icon in a row
- Show / Hide
Select a row to show / hide a column (the tick toggles on to show / off to hide a column):
Example: editing a multi-column tableEach row in the Associated With table holds details about a party associated in some way with the current Parties record.
To change a value in a multi-column table:
- Select its row:
- Scroll through the editing panel to locate the value to be edited and make your change.
The Associated With table holds four values:
Field
Field type
Description Party: (Associated With) Link to the record of a party associated with the current party in some way. Role: (Associated With)
The nature of the association (e.g. Collaborator, Partner, etc.)
Start Date: (Associated With)
The date on which the association commenced.
End Date: (Associated With)
The date on which the association ended.
- Save the record.
Text fieldsText fields appear similar to this:

Simply enter text into the field.
If you need to undo changes you've made to a record, you can do so BEFORE saving the record:
Revert ChangesWhen you edit a record, and BEFORE you save the record, you will find an option to Revert Changes from the Options menu (beside the Save button):
Select this option to return the record to the state it was in before you made any changes to it.
- Select Browse.
- Select Save.
All new records or changes to existing records must be saved and validated before being added to the database. Record validation occurs when a record is saved.
Tip: Although it is not possible to Revert Changes once the record has been saved, suitably authorized users are able to restore a record to an earlier state using the EMu desktop client.


The primary purpose of Tasks is creation of new records:
- On a large device (desktop or tablet), select the Tasks icon (4 in the image above).
- On smaller devices, such as smart phones, Tasks are accessed via the Menu icon:
A list of tasks is presented:
- The list can be filtered by keying letters into the Filter tasks field.
- Select a task name to begin creating a new record:
An Insert Workspace is added to the Workspaces bar. Working in the Insert Workspace is the same as working in the Edit Workspace:
- Select a Record Section in the Record Sections pane.
- Expand each Field Group and add details to the fields:
Details about working with each type of field can be found here.
It is not currently possible to delete records from within Axiell Go. Suitably authorized users are able to delete records using the EMu desktop client.
A default inactivity timeout of 3 hours is set on a user's session. This value is specified in the API configuration deployments files. Please contact Axiell Support to modify this value.
Be sure to log out of Axiell Go when your work is done.
Depending on the size of your screen, the Logout option will either be accessed from Account (5 on the screenshot above):
or, on smaller devices such as smart phones, from the Menu icon:
Note: If left unattended, your session will timeout eventually. However, to avoid unauthorized access to your collections data, be sure to log out of Axiell Go when your work is done.